As Satch already explained in her last blog, we along with our good friend Jacklin, have the most brilliant tradition of making each other Christmas presents.
This stemmed from a time when we were all penniless students, and put in time and effort to show our love for one another instead of money. And even though we are all now employed full-time, and sadly no longer students, this has been a tradition that has stayed, and I certainly don't see my bank account complaining.
So, in the spirit of crafting - we thought we'd share this years gift creations! Satch and I had very similar gift ideas (great minds and all that...) and we're going to try and persuade Jacklin to do a cheeky blog on the gifts she crafted us too.
I got my idea when flicking through a magazine a little while back. I stumbled across a picture of a girl wearing one of those t-shirts with large lettering on them. You know the ones I mean? Some have funny phrases like 'Sex, Drugs and Sausage Rolls' and others just have the same word repeated.
They seemed like the perfect idea - relatively easy to make, and super easy to personalize to the person!

What you'll need:
- 1 cotton t-shirt in any colour (These were from Primark - £3.50)
- 1 pot of fabric paint in any colour (£4.95)
- Roll of Sellotape
- Old newspaper
- Scissors
- A permanent marker
- Access to a printer and paper!
And here's how to do it.
1. DESIGN
This is the fun bit - pick the words for your t-shirt!
- I tried to think of something witty and personal to the giftee, as well as being a short enough phrase to print on the front of a t-shirt. (As I learnt, the shorter the words, the easier to create a stencil!)
- Once you've decided, get yourself on a computer and open up MS Word. You need to print out the words to use as stencils on the t-shirts, so they need to be the same size.
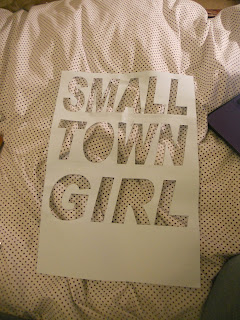
- The way I did this was to do it in Word Art. Pick your font, change it so that it just prints the outline, and select your size. Then copy and paste teh first stencil and just change the wording so the sizing stays consistent.
2. CREATE YOUR STENCILS
- Click print, and start cutting out the letters, making sure to keep any inner bits that you'll need to paint around later.
- I had a bit of trouble getting these neat, so after I'd cut it all out, I strengthed all the corners with sellotape.


3. PREPARE
- A bit of an obvious one, but cover the floor with newspaper as fabric paint is deisgned to paint fabric! I'm also one of the clumsiest people alive, so dressed in clothes I wouldn't mind inevitably being splattered in paint!
- Stick your stencils together, and line them up on the front of the t-shirt, then secure them down with sellotape around the edges.
- Take all your middle bits and pop a bit of sellotape looped round onto the back of each, then secure in place on the T-Shirt.
- Pop a single sheet of newspaper up the t-shirt to prevent any run through.
4. PAINT AND CREATE
- Obviously!
- Once finished, let it dry completely (usually takes a couple of hours) before you remove the stencil.
- I then got a black fabric marker and wrote around the letters to neaten up the edges, and give it a comical comic book look!


And here are the finished products:
To be honest, I'm really very chuffed with them, and they went down a treat!
The inside jokes made all the difference, and added that lovely personal touch!


No comments:
Post a Comment