Thursday, 31 January 2013

2013 Bestie Bucket List


 Hello Friends,

We meant to get round to posting this blog aaaages ago, but we're just way too busy and important (ahem....).


In Summer 2011, Salt became single again after three years. She tried drowing her sorrows for a while, but when that turned out to be a terrible idea (Who'd have thought it?!), she decided to start doing little things to get her back on track to feeling like herself again and employed the help of Satch (of course) and our friend Jacklin, to come up with a bit of a bucket list for her. However, as Salt didn't, in fact, get round to doing anything on the list, we've decided that there's strength in numbers, and we're going to do it together.


We're calling it our 2013 bestie bucket list but don't worry, we don't have a joint suicide planned in December!

The items range from big and scary to small and lovely, (thankfully, speed dating has been removed too) and we're going to blog about how it's all going throughout the year. Anyone is welcome to have a go at our list, and see if you can beat us, which, as it's the end of January and we haven't started it yet, is probably likely. As we mentioned earlier, we're just too busy and important!


So here it is :)


Write a Novel


Run a Half-Marathon


Knit something 


Bake something you've never baked before


Read a classic novel you've never read before


Watch a film saga in one sitting


Get a tattoo (SO scared!)


Watch a classic film you've never seen before


Learn 3 new songs on an instrument


Start your mornings a different way every day for a month


Learn to draw something you can't currently draw


Send a lovely text to a different person every day for a month


Have a complete makeover


Wimbledon


Drinking match with Daddy Satch (Much harder than it sounds!)


Burn a load of unnecessary old stuff on a bonfire


Put on an AMAZING meal for your friends


Sky Dive


Bake 10 different cupcake flavours


Try on 3 things in a shop you normally wouldn't touch


Get something super weird from a charity shop and wear it out


Walk on custard


Learn wine appreciation/wine tasting


Skinny dipping


Horse riding


Make a fancy dress costume from scratch


Learn to drive (Neither of us have done this, despite Salt trying...)


Have a proper greasy kebab (Satch still hasn't done this, as she was a let down of a student, apparently!)


Buy the stranger in the queue behind you a coffee.


And thats that! 2013 looks like its going to be exciting! What do you reckon? Any take your fancy? We're always happy to hear about your progress and suggestions/recommendations.

Happy New Year,
Salt & Satch

Tuesday, 29 January 2013

Bold Slogan T-Shirts


As Satch already explained in her last blog, we along with our good friend Jacklin, have the most brilliant tradition of making each other Christmas presents.

This stemmed from a time when we were all penniless students, and put in time and effort to show our love for one another instead of money. And even though we are all now employed full-time, and sadly no longer students, this has been a tradition that has stayed, and I certainly don't see my bank account complaining.

So, in the spirit of crafting - we thought we'd share this years gift creations! Satch and I had very similar gift ideas (great minds and all that...) and we're going to try and persuade Jacklin to do a cheeky blog on the gifts she crafted us too.

I got my idea when flicking through a magazine a little while back. I stumbled across a picture of a girl wearing one of those t-shirts with large lettering on them. You know the ones I mean? Some have funny phrases like 'Sex, Drugs and Sausage Rolls' and others just have the same word repeated.

They seemed like the perfect idea - relatively easy to make, and super easy to personalize to the person!


What you'll need:
 - 1 cotton t-shirt in any colour (These were from Primark - £3.50)
 - 1 pot of fabric paint in any colour (£4.95)
 - Roll of Sellotape
 - Old newspaper
 - Scissors
 - A permanent marker
 - Access to a printer and paper!


And here's how to do it.


1. DESIGN
This is the fun bit - pick the words for your t-shirt!
- I tried to think of something witty and personal to the giftee, as well as being a short enough phrase to print on the front of a t-shirt. (As I learnt, the shorter the words, the easier to create a stencil!)
- Once you've decided, get yourself on a computer and open up MS Word. You need to print out the words to use as stencils on the t-shirts, so they need to be the same size.
- The way I did this was to do it in Word Art. Pick your font, change it so that it just prints the outline, and select your size. Then copy and paste teh first stencil and just change the wording so the sizing stays consistent.

2. CREATE YOUR STENCILS
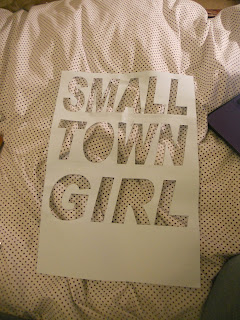
- Click print, and start cutting out the letters, making sure to keep any inner bits that you'll need to paint around later.
- I had a bit of trouble getting these neat, so after I'd cut it all out, I strengthed all the corners with sellotape.


3. PREPARE
- A bit of an obvious one, but cover the floor with newspaper as fabric paint is deisgned to paint fabric! I'm also one of the clumsiest people alive, so dressed in clothes I wouldn't mind inevitably being splattered in paint!
- Stick your stencils together, and line them up on the front of the t-shirt, then secure them down with sellotape around the edges.
- Take all your middle bits and pop a bit of sellotape looped round onto the back of each, then secure in place on the T-Shirt.
- Pop a single sheet of newspaper up the t-shirt to prevent any run through.


4. PAINT AND CREATE
- Obviously!
- Once finished, let it dry completely (usually takes a couple of hours) before you remove the stencil.
- I then got a black fabric marker and wrote around the letters to neaten up the edges, and give it a comical comic book look!


And here are the finished products:


To be honest, I'm really very chuffed with them, and they went down a treat!
The inside jokes made all the difference, and added that lovely personal touch!

Happy Birthday Satch!

Hello everyone!

Salt here! I know its been a little while since I've posted on here, but as I'm sure many of you know, today is Satch's birthday!
(If you didn't know this, then why not? She'll be very dissappointed! Best buy her a large gift to make up for it...)

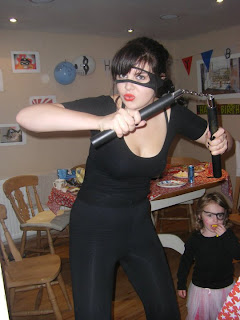
I couldn't let the day pass without commemorating it in blog form, and what better way to do it than by combining Satch's two great loves - her own birthday, and a good old fancy dress party!

And so here, you can follow me on a little trip down memory lane of all the best (and worst) fancy dress costumes the two of us have shared.

Please be warned, before reading any further, that we were young in some of these pictures. We only discovered how to use make up properly at the age of 18 apparently...


HAPPY 22ND BIRTHDAY, SATCH!

Here's to many more years of friendship, fancy dress and blogging.
Love you always.

Wednesday, 16 January 2013

Bleach-Painted T Shirts


Hello Friends


Satch here – a very happy 2013 to you all! I had a bit of a crafty Christmas this year so there will be another blog or two following this one in the festive vein. I know it’s January, but let’s keep the spirit alive, shall we?


You may not be aware, but Salt, Jacklin and I have, in recent years, developed a bit of a Christmas tradition where we make presents for each other, instead of buying them. Seeing as I only became employed at the beginning of December, I was very thankful for this tradition this year and they won’t mind me telling you, I did their presents on a SUPER low budget! I nicked this idea off of another blog, but it was so cool I just had to try it and I’m quite happy with the results.


To make one of these bad boys of your own you will need:
A T shirt or Vest top 
A Large Piece of Cardboard
Clothes Pegs
Chalk
Household Bleach
A Glass Bowl
A Sturdy Paint Brush (I ruined 2 of mine doing this!) 

Start by stretching your top around the cardboard and peg it in place. This will stop the bleach from leaking through to the other side, and make it easier to do your design. Then, draw your design onto the top with chalk (which will wash off later). I had a cheeky practise with my designs on paper first. You can rub out the chalk and make changes, but too many lines makes it confusing and you don't want to make a mistake. 

Then, put a bit of bleach in the glass bowl, dip in your paintbrush and go over the design. It should only take a few seconds to come through. It's hard to get it all even so simply go over the patchy bits again until it looks how you want it. However, on Jacklin's top a few of the letters just didn't show up so I over did it and now some of them are a little bit too big: 


After you've finished bleach painting, leave it outside or in a conservatory to get some sun for an hour, so the design fully sets in, and then hand wash it. Then it should be permanent and machine-washable and everything! 

As you can see, the colour of the bleach varies depending on the colour and cotton content of the top. I did another one with a camera design for my cousin Naomi (which I stupidly wrapped up before I took a picture!) on a blue top and the camera turned out pink, but the blog I got the idea from used a blue top and the design came out white, so it's really a guessing game! But the colours are always quite complementary so it works :) 

 Look out for Salt's blog about what she made for us (we ended up with surprisingly similar ideas) and we might get Jacklin in for a guest blog so she can show off about her crafty skills (I'll give you a hint, my present involved cake and darth vader - beautiful!) 

Also, Salt and I are doing a 2013 bucket list this year, which we shall post shortly and keep you updated about our progress. It's gonna be a good year :)  

Friday, 14 December 2012

Festive Table Bundles

Hi everybody! Salt here :)

For anyone that knows me, and I'm assuming most of you readers do, you'll know how much I love Christmas!
Yes, Christmas is the reason I live off of Bulgar (more like 'Vulgar') wheat and carrot sticks throughout January, and yes, Christmas is the reason that I continually whinge about how many days it is until payday.
But how can you not love the decorations, the excitement, the presents, the carols...the list could go on.

I have a fair amount of spare time on my hands at the moment, and so this Christmas, I've done a lot of crafting. There will be posts on all of this to follow, but some involve presents - so they'll have to wait until after the big day.

One thing I can post now though, are these table decorations....

Simple to make, and you can make them as budget or elaborate as you like!
I think the grand total for the ones I made came to about £7, and I made ten of them...so not too bad really.

What you'll need is:
- Material (I bought pillowcases from Asda. They were £1.96 so easily the cheapest way to buy lots of material.
- Candy Canes and other sweets
- Gift Labels
- Ribbon (preferably with some wire trimming to help it keep its shape)
- Cardboard (I used an old pizza box)

First, I arranged the sweets into little individual piles (and ate all the spares...)


Then, I cut the material into a big square, and cut little cardboard circles to pop in the bottom to make the stable.
I stuck the cardboard to the middle of the material and piled all the sweets inside.


Finally, you pull all the corners up to the center and tie the ribbon around once to secure it in place. The slide on the gift label with the message and name, and pop the candy cane in place. Tie the ribbon once more to secure it all, and voila....
 (Yes, that is a letter from Professor Green you can see in the background...)

Simple to make, but I think they're really quite cute!
I like to think these are quite festive because of the red and white material and the candy canes.

But they could be used for any occasion, just alter the material and contents!

As always, let us know your thoughts, or if you've made anything similar!

Rumour has it there might be a cheeky joint post coming up, so keep your eyes peeled!


Wednesday, 28 November 2012

Eco Calendar

Alright kids? Satch here. As I’ve been unemployed since leaving Uni and won’t start my new job until next week, I shall be making A LOT of my Christmas presents this year. I thought I’d share with you a good Christmas present idea on a super tight budget, using stuff you already have at home, that I actually gave to my boyfriend for his birthday…in October…but it works well for Christmas. Bear with.

A few months ago, my boyfriend announced he didn’t want birthday cards this year. I was overwhelmed with emotion – no birthday cards? No anticipation as you open the card to see if there’s money inside? No mementos of your day to scrapbook? No fun card design you can cut out and save for a later crafty recycling occasion?! Admittedly, Cobb doesn’t do any of these things, but his main reasons for his insane choice were (annoyingly) more logical. According to Cobb:

1)       They don’t really mean anything – anyone can wander into Clintons, buy something with a standard joke on the front and sign it: ‘From Random Person’.
2)       Thus, you keep them for a few days and then just chuck them. (Well, I don’t but I hear regular people do).
3)       Therefore, it’s a waste of money.
4)       And also, bad for the environment.

He went on to say it would be different if someone made him a card, and used only things they had already so it was giving the materials a new lease of life (I’ll admit he didn’t say it in quite such a douchey way). So I decided to make him one. However, as you can see from the title of this blog, the idea may have evolved somewhat into something un-card like but, what can I say? I get carried away. 

So I set myself the challenge of using only paper I had already (and preferably not printer paper because that’s a) lame and b) not using up old stuff, and just making my parents buy more all the sooner. I came up with this little poem for the card, but as I had to make part of Cobb’s present (it’s his fault for having a birthday when I’m unemployed!) I realised I could put it in a calendar and do one line a page (I later realised there were 16 lines and only, ahem, 12 months in a year so had to double up a bit…). I wanted each page to look different, but all go together tonally and look kind of cool and eco and stuff seeing as Cobb is into that. I gathered up brown paper bags, newspapers, used envelopes and old brown card and paper that I already had in my craft box (always save for a rainy day!) and scoured Facebook for photo memories that would go with the poem.

The plan was this: 1) Cut and arrange the paper into A4 2) Print the photos, calendar and poem lines directly onto the paper 3) Hole punch and whack some string through (I found some old picture cord from somewhere) 4) Bob’s your uncle!


However, it did not go to plan! As you can see, the front cover material (thin brown cardboard) and my printer got on like a house on fire. Unfortunately, I learned the hard way that tissue paper and printers are like my internal system and dairy – they don’t get on. What’s worse is that having unjammed my printer from the brown paper bag it had ensnared, I couldn’t cancel the print job in time and ended up with a 12 page calendar on printer paper, and 12 separate pages of recycled materials (well, 11 after the printer was done with the paper bag) that were going to go to waste (which, as you are well aware, was the opposite of my intention). 


I did the best with what I had – I wrote or traced the months onto the recycled pages (you’ll notice which ones I did free-hand – they’re the crap ones), cut and stuck the rest on, and either saved what was left for another time, or put it in the recycling (so I still get green points!)


This deconstructed envelope is my favourite, even if it has my Mum's address on it!

And voila! You could do all sorts of variations. You could use wrapping paper to make it more colourful, or in-jokes instead of lines of a poem (which, in retrospect, would have been less cringey) or pictures and quotes from their favourite films. Either way, one excellent, personal, home-made gift without spending a single penny. Result! 


Satch & Salt


Well, hello there! It turns out you have stumbled upon THE GREATEST BLOG ON EARTH! Congratulations!

So about us…Satch (who also goes by Satchell, Satchbags, Satchface (you get the gist), and very occaisionally, Moyra) and Salt (Aka Salter, Ginge and, thanks to a wonderful ex, Pumba…) have a long and glorious history together of love, friendship, a brief period of hate (in fairness, we were in middle school), and Satch taking the piss of Salt.

Here’s the earliest photo we could find, from Satch's 15th birthday – looking good, no?


Both of us have also been known to blog every now and then, and so as Salt sadly lives in Cardiff these days and Satch sadly, well, doesn’t, we decided to join forces to create what was previously referred to as THE GREATEST BLOG ON EARTH! How could it not be the greatest with two such forces combining?!

Here you’ll find the entire world’s (ok, our – we’ll try and be a little more humble from now on…) best ideas for making life a little bit more lovely on a budget. Whether it’s crafts and cake you’re after, or a cheeky bit of beauty blogging (apparently Salt is addicted to it!) you’ll find it here! We’ll even be working our way through our bestie bucket list (which we shall post for you shortly) and any suggestions are welcome (although often ignored.)

 Here’s our most recent picture – well, the hair got better but we developed a taste for wine!


Sometimes we might get a few friends to pitch in and contribute, or we might find we’re just too awesome and don’t want to share the glory. Either way, prepare to be amazed, dazzled and astounded! (Or maybe we set the bar a bit high…)